NISMO B13 Brake Upgrade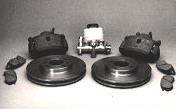
 How Much? How Much?
What is
included
What is the
performace
Installing
the brake upgrade
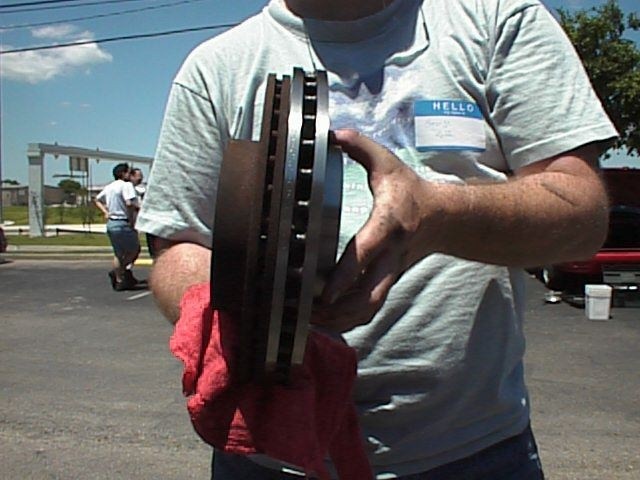
Pictures of Shell's B13 brakes
P/N DES UNIT PRICE
---------------------------------------------------------------
41060-54C88 Front brake pads: $51.00 /set
41080-54C26 Front shim kit: $15.19 /each
40206-54C01 Front rotors: $61.82 /each
41011-54C03RE Front calipers: $93.00 /each
41001-54C03RE Caliper core charge: $60.00 /each
--------------------------------------------------------------
Master Cylinder $157.44/set
NOTE: The core charge is not refundable. A core
credit is not possible when the core returned is not exactly the same product received. In
other words you are receiving an NX2000 caliper and returning a Sentra core. Nissan will
not accept this exchange. I checked with Nismo and their policy is the same. When you buy
the kit from them, core returns are not accepted.
What is included with the NISMO
brake upgrade kit?
Comments by Carson
M. Hanrahan
The B13 Brake Upgrade Kit, ordered from Nissan Motorsports in
California, includes upgraded front calipers, rotors, metallic pads, and hardware kit for
the calipers. Part #99996-B13BK. As far as I'm aware, Nismo does not sell an upgrade which
includes the rear brakes.
Because of the larger calipers, a new Master Cylinder must also be
fitted. Nismo has these for ABS and non-ABS cars. Get the one that's right for you. The
difference is simply that the non-ABS MC has the proportioning valve built into the MC,
while the ABS one has a separate proportioning valve. Part #46010-69Y20 (non-ABS) and
#46010-60Y21 (ABS).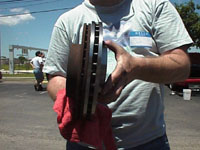
The rotors, calipers, and Master Cylinder are off of Nissan NX2000's
with ABS. I've been told they are also standard on Japanese-built SE-Rs.
The rotors are about 4mm wider in diameter than
stock and almost 10mm thicker. The calipers are accordingly larger than
stock and permit the use of pads with a larger surface area. The pads that come with the
kit are also slotted to permit venting of gas and dust.
NOTE: The kit *should* fit under the stock 14" wheels
and requires the removal of the front backing plates.
 Comments by Carson M.
Hanrahan Comments by Carson M.
Hanrahan
Let me give you an example. I had the brakes finished VERY late on a
Thursday night. Saturday and Sunday was spent on the track at Putnam Park Roadcourse, in
95+ degree weather both days, with only Friday's drive out to the track to bed in the pads
and get used to the brakes. The brakes performed like champs the entire weekend - I would
be on the track. driving hard, for 30 minutes or so at a time. It's tough circuit too,
almost 2 miles and 10 turns with a quarter-mile straight. Very fast and, if you're driving
it right, heavy on the brakes in some corners with a light trail-braking or left foot
brakes through others. The brakes absolutely did not fade, get mushy, or in any way
degrade the entire weekend. Fantastic!
Written by Don Dale.
Assemble the proper parts and tools. You'll need a new brake master
cylinder from an NX2000 (unless you already drive an NX), new front rotors, new front
calipers, pads and shims. Additionally, you'll need a set of metric open-end wrenches or a
ratchet set, a 10mm flare nut wrench, a jigsaw, rotary (Dremel) tool or other tool
suitable for cutting sheet metal, a brake bleeder hose, and a couple of pints of brake
fluid. You may also want to have a long-handled pipe wrench or torque wrench handy, in
case some of your bolts are on too tight for a standard wrench.
If your car is a Sentra SE-R and you plan to use stock wheels, you
need to grind 1.5 - 2 mm off the outside edge of the calipers in order for them to fit (a
machine shop will be happy to do this for you, for a few dollars). After the calipers are
ground, paint them with 500 degree paint to inhibit rust.
Master Cylinder
Place a thick layer of shop towels under the brake master cylinder.
It's located just inboard of the left front shock tower. There are four metal tubes that
run out of the MC; these are your brake lines. Using a10mm flare nut wrench, disconnect
these tubes from the MC. The tubes are filled with brake fluid and some will leak out --
that's why the shop towels are there. The nuts that hold the tubes on are quite tight, so
it'll take some muscle to get 'em off. You may find it convenient to remove your air
intake box to get easier access to some of the tubes.
Once the brake lines are disconnected, you can remove the MC. Along
the firewall, two bolts hold the MC to the brake booster. Unfasten these, holding the MC
steady as you do the last few turns. Carefully remove the old MC from the car; you don't
want to spill fluid if you can avoid it. (Note: if one is available, you can use a turkey
baster to remove brake fluid from the reservoir atop the master cylinder. However, the
author is not responsible for any domestic conflict that may result from this act).
Pour some new brake fluid into the reservoir of the new MC. Actuate
the pistons by sticking a screwdriver into the hole in the MC and gently pressing harder.
Pump the pistons until fluid starts to ooze out of all 4 holes on the MC. Now, reverse the
removal process to install the new MC. Bolt the MC to the booster, then attach the brake
lines. Your "heart transplant" is complete; you can now move on to the calipers.
Calipers/Rotors
Jack up the car at the front and remove both front wheels. Inspect
all parts so you'll have a good understanding of what you're about to attempt. If you look
into the wheel well, the rotor is the big thick metal disc that you're staring at, and the
caliper is the black or grey metal piece that's clamped on to the rotor. The brake line
joins the brake hose at the top of the wheel well, and the hose runs down to the back of
the caliper, where it's fastened by a bolt. Actually, the caliper is really 2 pieces, the
caliper frame or torque member which holds the pads, and the caliper proper, which
contains the piston and which squeezes the pads when you step on the brake pedal.
First, loosen the bolt which fastens the hose to the back of the
caliper. Don't take it off, just crack it a little bit so it's easier to turn. It's tough
to get enough torque to take off that bolt once you've unbolted the caliper from the hub
if you don't do this. Now, attach a piece of wire from the bolt you've just loosened to
some convenient spot on the strut tower. This is to prevent the brake hose from stretching
when you remove the caliper; if you don't do this, the caliper will hang by the hose after
you unbolt it from the hub.
Now you're ready to unbolt the caliper from the hub. The caliper
frame is fastened to the hub by two bolts; the heads of these bolts are behind the rotor.
Unfasten them (this is where I needed a long-handled wrench). The caliper is now held in
place only by the clamping power of the caliper itself, which is clamped onto the rotor.
Wiggle the caliper assembly off the rotor and gently ease it into a position where it's
hanging by the wire you've just fastened. Remove the rotor from the hub and set it aside;
you don't need it anymore.
Grab one of the two new torque members from your new brakes (if it's
attached to the caliper, just slide it off the slider bolts). Hold it up to the spot where
you've just removed the old caliper and frame, where you'll be bolting it in. It won't
fit! (That is, I know it won't, if your car is a Sentra. I have no knowledge of fit
problems with the NX or the 200SX). The splash guard, a piece of sheet metal just behind
where the rotor used to be, is in the way. Using the new torque member as a guide, cut
away the sections of the splash guard that interfere with proper fit. Once this is done,
slide a new rotor onto the hub and check to make sure that the splash guard doesn't
contact the rotor. If it does, cut away any offending part of the splash guard. Some
people advocate cutting off the entire splash guard, claiming that this will help cooling.
Now, assemble the caliper system. Slide the torque member onto the
caliper, making sure that the slider bolts are well lubricated. Insert the new clips,
shims and pads into your new caliper, using the old caliper as a guide for what goes
where.
With the rotor on the hub, slide the caliper assembly onto the rotor
and into place. Bolt it onto the hub. Now, remove the bolt that fastens the hose to the
old caliper, which has been hanging by a wire all this time. Make sure you save both
copper washers. Fasten this bolt, with washers as they were on the old caliper, onto the
new caliper. You can now remove the old caliper and the suspending wire.
Obviously, you need to repeat this process for the other front
wheel.
Bleeding the system
It's possible that during the installation of the master cylinder or
the calipers, pockets of air have entered your brake lines. These will inhibit proper
brake function and must be removed by bleeding the brake lines. Standard bleeding
procedure requires two people, though three is preferable. Bleed the brakes in order:
1. Left rear
2. Right front
3. Left front
4. Right rear
Bleeding procedure: Jack up the car at the proper corner and remove
the relevant wheel. Fasten a clear plastic bleeder hose to the bleeder valve on the
caliper, and place the other end of the hose inside an empty soda bottle or other
container. This tool is available for around $6 at any auto parts store. Open the bleeder
valve with a 10mm wrench. One individual climbs (gently!) into the driver's seat and pumps
the brakes. Another watches brake fluid coming out of the caliper through the bleeder
hose. A third watches the fluid level in the reservoir atop the master cylinder, pouring
new fluid into the MC as necessary. When new fluid is coming out of the hose with no air
bubbles, close the bleeder valve. Repeat this procedure for each wheel. When you're done,
the brake pedal should be rock hard. If it's "spongy", you've still got air in
the system somewhere -- bleed it again until it's all out.
After you're done, you won't need your old calipers or rotors
anymore. There's probably a core charge on the calipers, so box 'em up and send 'em in to
get your deposit money back. You can donate the rotors to someone else who still has the
stock brakes; you can easily find someone happy to pay shipping costs with a note to the
SE-R mailing list.
Good luck!
Don Dale later wrote:
I just solved my brake problem, and I thought I'd let y'all know so
that you don't run into the same problem.
My problem was that the bottom pin on my LF caliper was
"loose"; I could wiggle the caliper back and forth a little bit. This caused the
caliper to rattle on the pin over rough pavement or potholes. Meanwhile, my top pin was
very tight; I had a devil of a time inserting it into the rubber seal.
It turns out that the two pins have slightly different diameters!
Switching lower for upper and vice versa solved my problem completely.
Just something you might want to watch out for if you're putting
calipers back on -- make sure the thicker pin is on the bottom.
How does one remove the dust shield? Some people
have had problems with the dust shield rubbing against the rotor on sharp turns.
Comments by George Roffe
Actually, removing the dust shield is really easy! We should
probably get it into the FAQ since Tim at Precision Imports had the same difficulty as you
(and I'm sure others have too).
The dust shield is actually just pressed onto the hub. I used a
screwdriver (the ultimate universal tool besides the hammer huh?) and a hammer. Just put
the blade of the screwdriver against the back of the dust shield where it press fits and
nail the other end with the hammer. It took a few minutes, but really wasn't that bad.
Once it was off the hub I just twisted it with linesman's pliers until it broke. If you
have trouble, email me over the weekend and I'll try to get a little more specific, but it
shouldn't be necessary. Really, it's just a press fit and should be easy. Hell, my car
endured 4 years of upstate NY winters before coming to Texas and it was easy on mine.
|