![]()
|
Turbocharging The Sentra SE-R
Text & photos By Evan Griffey
[Put into HTML format by Dan Thompson]
This article originally appeared in the Turbo & Hi-Tech Performance May 1995 issue and was reprinted with their permission. For more info on Turbo Magazine check out their website .

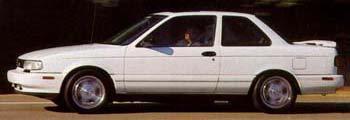
Since its redesign in 1991 to its final run in 1994, the Nissan Sentra SE-R has been a mainstay of All-Star and Top 10 lists in all the new-car magazines. The Sentra's muscular 140-horsepower, 2.0-liter, 16-valve, double overhead-cam powerplant, nimble handling characteristics and miserly price tag made it one of the hottest, most attainable performance-oriented properties on the market. What more could one want from a project car?
To bring you up to date, let's outline stage bolt-on modifications performed on the Nissan. Under the hood, a K&N filter element and velocity stack-type air horn was installed. A two-inch Stromung aluminized-steel exhaust was hung on the stock mounting locations and to take advantage of the SE-R's new lung capacity, a Jim Wolf Racing P.O.P. EPROM computer upgrade was added to the mix. Proper planning resulted in a combination of components that complemented one another and delivered the goods to the tune of a 22 to 28 horsepower gain. A Centerforce Dual Friction clutch was then installed to get the newfound power to the pavement.
The suspension upgrades, just like the motor modifications, were designed to work in concert, providing slot car-like handling. The suspension consists of Eibach progressive-rate lowering springs that drop the Sentra 1.25 inches, stiffer sway bars (32mm front - 29mm rear) and G.A.B. adjustable shock absorbers. The front shocks are four-position units that utilize a pair of custom-built strut tower supports. The rear shocks feature eight-way adjustment.
 |
||
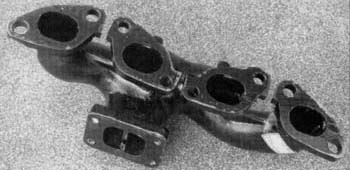
| The first step of most any turbo conversion is finding an exhaust manifold. We looked for Japanese-only cars with the SR20DE or a similar motor in turbo trim. Our savior was the Pulsar GTi-R. A call to Nissan Motorsports and we were handled. | ||
|
||
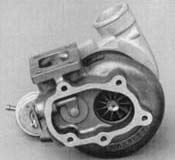
| The Garrett T25 turbo used on the SE-Rious Sentra was built by Turbo Engineering Corporation (TEC) of Magalia, California. The TEC staff asked us what we wanted from the car - i.e. low, mid or high-range power - and quizzed us on the at-speed rpm of the 2.0-liter. |
In this trim, the car's 0-60 times plummeted to 6.48 seconds from published marks of 7.6 seconds. The car ran great and durability was not compromised in any way. The SE-R's heavyweight punch only fanned the flames for more power. The next step - Turbo Power. The first order of business was devising a plan of action and outlining the goals and limitations of the build up. It was decided to make the modification without disturbing the stock internals and intercooling was also in the cards. But before the ball could get rolling, an exhaust manifold with a turbo flange that would fit the SR20DE SE-R motor had to be found. A little research uncovered the Japanese Pulsar GTi-R Turbo which is powered by a 2.0-liter engine that is, more or less, identical to the Sentra's. A call to Nissan Motorsports and the part was on the way.
Upon receiving the exhaust manifold from Nismo a stencil of the flange was made and faxed to the experts at Turbo Engineering Corporation (TEC) who built a Garret turbo specifically for this application. After making notations on engine rpms at cruising speeds of 40, 50 and 60 mph and the type of performance we expected (i.e. low-end or top-end power) TEC's Brad Lewis calculated what kind of turbo would best match the motor and deliver the proper driveability. TEC custom-built a Garrett turbo which started life as original issue on a Pontiac 3.1-liter V6. The Garrett T25 was modified with a housing better suited to 2.0-liter duty. The turbine housing has a .68 A/R ratio. This ratio dictates the speed at which the exhaust gas strikes the turbine blades. It is the velocity, volume and latent heat energy of the exhaust that determines the spooling characteristics and at what point in the powerband the turbo provides significant boost. This ratio is determined by dividing the nozzle area of the housing by the distance from the center hub of the turbine wheel to the central plane of the nozzle area. A smaller A/R ratio will quicken turbo response but make less power at the top end due to backpressure. A larger A/R ratio will provide more high-rpm power but take a bit longer to spool up.
|
||
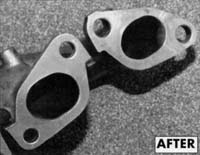
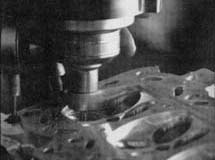
| We had the rough cast-iron manifold ExtrudeHone ported to improve flow. You can see the dramatic impact the process had on the primaries of the manifold. |
While the turbo was being constructed, the manifold was sent to ExtrudeHone to be ported and polished as the interior surfaces were extremely rough and flow-restrictive. The first thing the ExtrudeHone crew did was construct a fixture. The fixture is designed to route the ExtrudeHone media to the necessary portion of the piece and is the most time-consuming part of the process. Once the fixture is joined to the intake and positioned on the ExtrudeHone machine, the media is moved through the manifold under a precise pressure. The media hones out the manifold more aggressively where it encounters the most resistance. The amount of material removed from any given application can be controlled by how abrasive a media is used and the amount of hydraulic pressure exerted during the process. For automotive applications 30 to 400 psi is used depending on the part. The media is moved through the piece in both directions, some pieces may require 50 to 100 runs in both directions depending on what the part is made of and/or the desired effect.
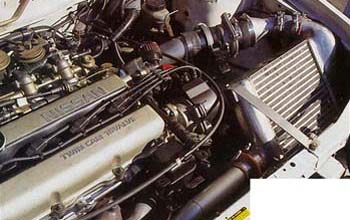 |
| Here's the raw turbo/intercooler installation. We plan on boxing in the intercooler to enhance efficiency and powdercoating the intercooler to make the 2.0-liter look the part. |
The most labor-intensive portion of the project was the design and fabrication of the plumbing, oil lines and intercooler system. Once the turbo was mounted to the exhaust manifold, John Mueller of MF-Power lined up and test fitted the assembly. The internal wastegate actuator rod required alterations to clear the front of the block. Once the wastegate modification was completed, the whole shooting match easily bolted to the engine. From there MF-Power, who you may recall race-prepped the engine on the "Dusty Trails" Mazda 323 GTX in our November '94 issue, set off to design and fabricate the intercooler ducting. After romancing the idea of a trick hood with aggressive scoops, the stocker with radical elevated hood scoops and the stock hood with NACA-style ducting, it was decided to keep with the sleeper theme of Stage I. The intercooler, consisting of a 10 x 10 x 3-inch HKS core and end caps, was positioned in place of the battery on the driver's side of the vehicle at a 45-degree. The battery was mounted in the trunk. Air would be directed to and through the intercooler by removing a section of the upper bumper valance below the headlight. The Mueller design then called for a ramp leading from the edge of the bumper to the intercooler as well as a lid that seals in airflow from above.
 |
| A multi-angle valve job was performed at Benson's Automotive on the company's Serdi 100 machine. |
While the plumbing was under construction a 2mm metal head gasket was ordered from HKS. While the gasket was enroute to the States via ship, we took advantage of this time and had the flow characteristics of the head improved. Bill Craddock of Craddock Enterprises was called on to smooth the runners and do a little cleanup on the exhaust side. Craddock was impressed with the quality of the Nissan piece. Next, the head's world tour stopped at Benson's Automotive to take advantage of the shop's Serdi 100 machine. The Serdi delivers a precise multi-angle valve job that greatly enhances low-lift flow. Back at the friendly confines at MF-Power, it was time to put all the pieces together. MF-Power shimmed the valvetrain to race specs, and it was at this time we discovered the expensive HKS gasket originally designed to the Japanese Pulsar wasn't a perfect fit. A careful trimming session later and it was all systems go.
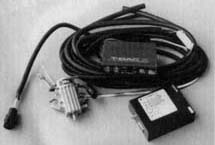 |
| Boost level is controlled by a T-BAC III from R.S. Akimoto. In addition to boost level, the T-BAC III can also control the slope of the boost curve. |
As the project began to take shape we decided to switch over to a blow-through mass air set-up. With MF-Power busy prepping SCCA racers, we enlisted Jerry Belanger of Belanger's Muffler to fabricate the revised ducting which included a pipe to replace the OEM intake boot that we felt would flex or rupture under boost. While this was being done, a Racing Sports Akimoto/M's T-BAC III boost controller was installed. Like many of the boost controllers on the market, the T-BAC III uses an electronically controlled valve body plumbed into the vacuum line leading from the compressor to the wastegate. This valve body intercepts the wastegate signal and, via its electronic control, sends its own signal which tricks the wastegate into maintaining a higher boost pressure. The T-BAC is part of a new generation of boost controllers that actually allow the driver to control the slope of the boost curve. The valve body preloads the wastegate actuator which controls how quickly boost is generated. Controlling the boost curve should allow drivers to launch at a boost pressure that won't induce wheelspin.
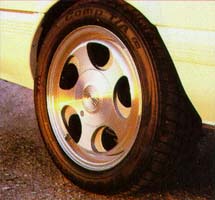 |
| American Racing AR-255 wheels and P205/50ZR15 COMP T/As |
To visually enhance the car, 15x7 American Racing AR-255 slotted wheels and 205/55ZR-15 BFGoodrich Comp T/A tires were bolted to the Nissan's hubs. We really like this combo as the AR-255s are unique and the 50-series rubber makes the sedan stick like a slot car. The AR-255s are two-piece aluminum alloys featuring a polished and clearcoated finish. The slots are powdercoated gray, but you can order inserts in a variety of hues to color-match the wheels with your car if desired.
Here's where we stand at the end of part one. Our TEC turbo is in place and plumbed and the MF-Power designed intercooler system has been swapped over to a blow-through mass air sensor. To ensure we are ready for tuning a T-BAC III boost controller has been wired up.
In our next installment we will address fuel enrichment with Jim Wolf Racing, finalize the clever intercooler ramps, dress up the engine bay a bit and add a host of GReddy products. Who knows, we may even take some performance runs. Stay tuned.
 |
 |
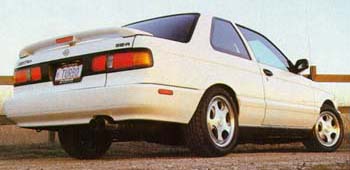
| The car is up and running but you'll have to wait to see how hard the 2.0-liter pulls. Our next SE-R article will include some additional turbo system modifications, tuning at Jim Wolf Technology and maybe some performance figures. |
| The Source | |
|---|---|
| American
Racing Equipment 19067 S. Reyes Ave. Rancho Dominguez, CA 90221 (310) 635-7806 |
ExtrudeHone 8800 Somerset Blvd. Paramount, CA 90723 (714) 573-2350 or 8075 Pennsylvania Ave. Irwin, PA 15642 (412) 863-5900 |
| (BCE) Bill Craddock Engineering 10808 Foothill Blvd Ranch Cucamonga, CA 91730 Phone: (909) 944-8097 Fax: (909) 944-8933 |
HKS USA,
Inc. 20312 Grammercy Pl., Dept THP Torrance, CA 90501 (310) 328-8100 |
| BFGoodrich
Tires P.O. Box 19001 Greenville, SC 29602-9001 |
MF-Power 10672 Pearl St. Garden Grove, CA 92640 (714) 530-7849 |
| Belanger's Muffler 8 McLaren, STE. R Irvine, CA 92718 (714) 837-9446 |
Motul 764 B Indigo Ct. Pomona, CA 91767 (800) 926-6685 (909) 625-1292 |
| Benson's Performance 2909 S. Kilson Santa Ana, CA 92707 (714) 241-1284 |
Turbo Engineering Corporation 15870 West 6th Ave. Golden, CO 80401 |
| Centerforce
Clutches Centerforce Division Midway Industries, Inc. 2266 Crosswind Drive Prescott, AZ 86301 |
Jim
Wolf Technology 212 Millar Ave. El Cajon, CA 92020 (619) 442-0680 |
| Eibach
Springs 15311 Barranca, Dept. THP Irvine, CA 92718 (714) 727-3700 |
|